Friday, 23 September 2011

Reflecting back on the AS year... Technical Skills

Well, the most important of all, I learnt the brilliant skill of using a mac, they're not as pure and simple as they look! However this was fatal, the mac is where I spent most of my time doing my media work and perfecting everything to the extent I felt necessary. In front of these computers my group and I had great laughs and light hearted arguments so show just how much we cared for the project.


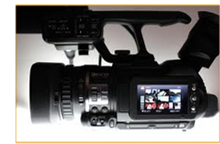
The Camera and tripod... I remember switching on the camera was this tricky bit. The rest, each button explains itself. The lens turns to zoom in and out, however it's important to remember putting your shot into focus. The review button and the technique are one of the most important things to remember. The technique was to count to four after hitting the 'record' button this is so that the camera is already rolling when people are still getting prepared to make sure you don't miss the beginning and the same applies for the end. Review, is mostly important so that if you shoot bad footage you can see it right away and re-shoot while everything is still in place instead of seeing it back in the editing room and having to go set everything up again. Tripod is the most genius little object - steady as a rock... great for still shots or tracking.
The editing software was hard to figure out at first but once gotten used to it, you  realise it's potential.When editing 'Violet' final cut pro came in incredibly handy when looking at our editing all of the cutting shots placed so closely together, also the filters helped to create excellent dramatic effects. Final cut pro can be used for many different things. Last years thriller was a very different piece to a music video. The style of the editing is very different, 'Violet' was lots of different cuts to create one long video, and the cuts came for when it felt right to the footage. However with music video, we use the base track system, add lots of videos and make sure they are all in time with the lip syncing, then cut to a beat not at random and choose part that work most well together.
Also, last years little extra challenge was creating your own piece of music that would accompany the thriller in an affective way. However this year, we only need to decide on the song. Using Soundtrack Pro was really beneficial to try and work out what sounds go well together and which don't. It got me to experience with a wider verity of editing techniques. The same goes for Livetype. It was interesting to use and considering our film was a title sequence the text was a very essential part of our videos. However now, with the music video, it depends on the song style and choice but mostly it's not common that music videos contain text etc.
HandBrake was a big part of the project and it was important to develop skills within the programme because once the video has been made in final cut, it is necessary to change the video into an mp4 (iPod) format to upload on the blog!
It is also more pleasant to review work using Quicktime player, and as a matter of fact this was a very important part of last year too. I found out that not only could I watch the videos that I have created with Quicktime I can also create them by arranging the settings to watch my computer movements or connect the webcam to view me do my work. This was great and turned out a very useful piece to remind me of how work is done, what tools do from my previous projects. It also did a great job in use of evidence of the work that was produced.

Thursday, 22 September 2011

Analysis of a Music Video

'Cool' by Gwen Stefani uses illustration to tell the story of two lovers who have had a relationship in the past, but now are with other people and have stayed friends regardless. Yet in the video we see a sense of sexual tension between the two when he brings his new girlfriend over to visit. I think this video is the perfect example of the use of illustration as it demonstrates two timeframes: The past and the present. In doing this we are able to follow the storyline which fits in perfectly with the song. Furthermore, this video promotes the artist quite well as the images all revolve around her. Slow motion as well as fast edits are used at the very beginning in order to cut to the beat of the song. For example, the pace of the edits get faster as the music anticipates throughout. I quite like the use of many images put together in this particular video as it fits well with the theme and genre of music.


Laura Mulvey's Ideas On Representation

Laura Mulvey, suggest's: "In a world ordered by sexual imbalance, pleasure in looking has been split between active/male and passive/female. The determining male gaze projects its fantasy onto the female figure which is styled accordingly"


In other words, she's saying that women are seen as objects to men in society. Furthermore, this can be related to music videos, because men use women as eye-candy to enhance their song/appeal to the male gaze. For example, in Candy Paint, a song about cars women are used directly flaunting their female attributes in front of the camera whilst the artist is singing in the background which is related to the song what so ever:


Reflecting back on the AS year... digipack research!

In class we went through a few Codes and Conventions of the Digipack. We discussed the type of things that you’d expect to see on the front cover; the name of the artist (has to be the biggest), the name of the album,  the genre is usually predicted by the style of the front cover for instance if the artist is a pop singer it is likely that their face will be on the front cover, if it’s a rock band or other often can even be a picture of something random, take for instance ‘The XX’ who only have an ‘XX’ on the cover and nothing else at all. They often have a promotional tour sticker also.
We looked at the conventional information included on the back cover; track list, barcode, small print production introduction, parental guidance if necessary, etc. A lot of images normally take up more than one panel. On the inside of the panel, we often notice the thank yous and/ or lyrics. The text used is normally a variation between 2 fonts and 3 different colours are used at a maximum, keeping it simple and avoiding curly fonts are usually most beneficial. Digipacks often have a spine, and the spine of the cover contains the name of the artist, album and usually a record label.
I have taken all this research into consideration and created my own digipack for the video that I produced earlier.


I created this is Adobe Photoshop. We had a tutorial for using Photoshop, this was lucky for me because I haven't used Photoshop before, so it was nice to learn using different programmes, the only problem was that computers and I don't get on. I'm sad to admit that I am the cause of my problems. My tutorial guide - Marisa taught us how to cut around images, insert fonts, play with the colours to make it more appealing and exciting. We were given a template to fill in with image and put the knowledge that we learnt earlier into practice. 
It was hard for me at first to work with all the different tools as Adobe has a lot to offer my favourites were probably colour contrasting. 

Here is an image from the original shoot, I have put this up to show the difference that adobe can make to a 'photograph'. This is rather blunt, but with adobe I exaggerated the light and effects of the definition of the photo. I have also added a circle that represents where the CD would be placed within the digipack. 


Developing skills on adobe isn't easy especially with all the possibilities. I can't say I've mastered the skill just yet. It was complicated having to choose the images that went onto my digipack because to some extent I felt that there needed to be a harmony between them however that's difficult to capture especially when adding effects to the images. The image I find most interesting is the one that I used for the front cover. The reason is that as all pop covers it has a close-up of the artists face but with this being a 'band' there is a reflection of each member in the glasses. I just think it's a nicely captured image, it definitely has the creative factor which makes me appreciate it even more. 
The tool that I have experimented with most in is class is probably the magic wand tool. I like it mainly because it's purpose is to cut around a specific part of the image, and the you can edit it in a way that can give the picture a different atmosphere. As an example here is a flower, the sunflower had a background that was in the original image, however using the crop tool, the flower is now on a simple white background. This is also useful for colliding images and experimenting with visual arts. 


The type tool; is great for adding text to images, for instance how I had to put text on my front and back covers, it comes in handy particularly in advertising and is less based on the appearance as much as it is based on being able to provide written information through a project for example a poster. This is beneficial because you don't require any additional programmes to add in the text. 


The crop tool; it was useful because it made it easier to work with the shots, if for instance the shot had too much available space it is useful to 'crop' it out so that the viewers attention isn't focused on anything but the main subject. Here is a quick example, a comparison between a cropped picture and one that isn't...
I am happy with the finished piece, but now looking at it a while later I would change quite a few things, for instance think more about the location - instead of filming it on chairs maybe using a plain wall behind and standing so that there would be more movement to make the video more engaging. Also thinking more about the mise en scene as you can see in the above picture there is a tripod on the scene, something I hope to not have in the final video (unless it's intentional). Maybe in the acting and lip syncing annunciate a bit more and try to keep up with the rhythm. All of these I would change in order to create a more professional and effort-full looking video.

Reflecting back on the AS year... first task for A2!

We were going into practice. “Filming for base track editing” was our first assignment.
“Film for up to 2 minutes of the song – have at least 6 base tracks” This was mainly just a practice, and a taste for the new skills we will be developing in this year’s coursework. We chose groups and were given a song to create a video to. This activity was meant to be great practice for lip syncing, which would have been the case if we hadn’t failed to complete the task correctly. We as a team filmed a variety of shots none of which contained lip syncing… our plans were soon put to a stop as we went to re-shoot the video. This was no big deal, we completed the task as we were asked and also managed to include some creativity from the previous shots that we have done.
This task is also great in terms of an introduction to popular camera angles when making a music video. Here is a list of effective shots:

·         Hand held tracking close-up

·         Hand held tracking long shot

·         Mid shot with camera on tripod

·         Long shot with camera on tripod
Of course, this isn’t the complete list, but a good start for any music video. So anyhow, we have officially filmed and edited. Have a look at our finished piece…


The filming of this video was great fun! We tried to be creative and unique in our work. Having interpreted the lyrics of the song we decided to do a 'cheesy' video, it suits the pop theme. This task got us to experiment with different types of shots, be enthusiastic and I think the best part was getting others involved. I hope this becomes a re-occurring theme for this years project. The editing then had to be re-arranged to have a variation of shots in time with the music. The main thing we've learnt about music videos is that they need to keep the viewer interested. This is normally done by editing to the beat and making the audience feel engaged in the video. 
I'm not going to lie. This is hard. It was hard lip syncing to a song we didn't know the words to, I see why this was a great exercise to prepare us for our real video, make note: TRY TO LEARN WORDS ASAP! Otherwise.. it looks WEIRD. It's also important to pronounce words clearly, because when it comes down to the editing, if you can't match the lip syncing to the song lyrics whilst it's playing, you're in trouble and it's likely that a re-shoot is in the cards. 

Here is a short 'story board' of how we edited our video... 

First, we imported all of our footage into Final Cut Pro, as well as the sound track. We placed all the footage we wanted to use one underneath the other and matched them to a point where all three videos are lip syncing at the same pace and also inserted our additional footage just in case we decided to bring it into use. We then listened to the song and every four beats marked a red point along the footage, this mark later indicated to us where all videos need to be cut. 


Once we cut up all the base tracks we matched different videos to see what worked and created a variation of shots by deleting the cuts the we felt were not strong enough to use in the video. Here is a closer look of our final efforts:

The final edit... could have been better, if we weren't in such a rush to finish and took the time to make this perfection my view would be different. Overall, we worked hard and it was our first try, I'm happy with the finished product but I hope to have more experience and vision for the 'real' project.  

A brief introduction to myself...

Hello again my dear blog… the whole summer, we have been apart and now hey, it’s time for my next assignment. I’m very interested in music therefore this year’s prospects look promising!
 Name: Erika Aleksejeva
Age: 17
Origin: Lithuania
About: Likes tomatoes, comedy, and literature, music (especially rock and folk) highly passionate about ‘Euro basket 2011’. Dislikes very little, and often refers to self in 3rd person.

THEORISTS- Andrew Goodwin's Theory

Andrew Goodwin's Theory rely's on the specific type of relations between songs and videos. He has three main ideas in order for various videos to be constructed around
Such as:

Illustration: Where a video follows the lyric and tells the story


Amplification: Occurs when the videos introduce new meanings that do not contradict with lyric but add layers of meaning


Disjuncture: When there is no connection between the lyric and video